Setting up Shared Mac
This document walks through the basic set up procedures for configuring the Mac Pro in a computational research environment. If this is a new machine, start with Account Initiation. If this is an existing machine and you only need to create a new account for yourself, begin with Create user account and Modify /etc/sudoers in Account Initiation and then follow Customization.
Account initiation
NOTE: This must be done by the computer administrator.
Setting a root account password
- Choose System Preferences in the Apple menu and click on Accounts.
- There will only be one account, the one created by the Electronics Shop. This account is your root account and has all the administrative privileges. You need to change the password from the default given by the Electronics Shop to something else.
- Check the box next to ‘Allow user to administer this computer’.
Creating user account
- While in the Accounts menu of System Preferences, click on the + button in the bottom left corner and fill in the form with appropriate information. (You may need to first click the lock and enter the credentials to enable changes.) Keep in mind that once the “Short Name” is set, it cannot be changed. This will become the name of your home directory and the only way to change it is to create a new user account.
- Choose a picture by clicking on the picture icon if you like.
- Make sure the account type is ‘Standard’. If the “Allow user to administer this computer” box is checked,‘ uncheck‘ it. This is a simple safety system that will force you to enter the root password for any major modifications and prevent you from making any serious mistakes inadvertently.
- Select Login Options at the bottom of the list of users. Disable the automatic login, and select the checkbox “Enable fast user switching.” Fast user switching is a way to allow multiple users to log in at the same time and switch between desktops.
Modifying /etc/sudoers
- The file
/etc/sudoersis a file that contains the usernames of users with advanced permissions. You want to add your name to the file to allow yourself administrative privileges for some of the linux-side applications. - Open a Terminal window. The Terminal launch icon can be found by opening the Finder (the “face” icon in the task bar at the bottom of the desktop), clicking on the Applications menu in the side-bar, and scrolling down to the Utilities folder where Terminal is located.
- A new window will open with a command prompt. At the prompt, type the following commands:
sudo visudo
Password: (enter the '''root''' password)
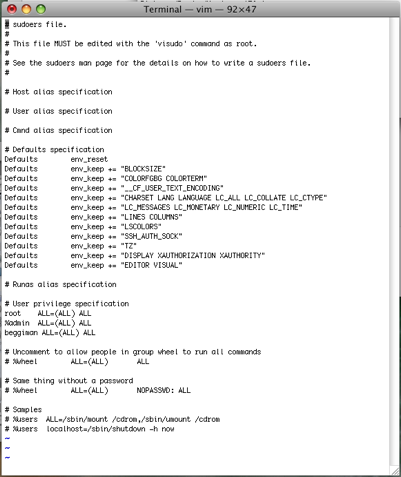
This will open a file and change the screen to look similar to the one shown below. To modify this file, move the cursor to the bottom of the ‘User privilege specification’ section (use arrow keys). Next type shift-A. This will take you to the end of the last line, and change to insert mode (the word insert should appear at the bottom of the page). Then enter a carriage return to begin a new line and type username ALL==(ALL) ALL as in the example file shown below. To exit, press the escape key, and then type :wq! 
Logging in to your account
- With Fast User Switching enabled, you should be able to click on the user name displayed in the upper right hand corner of the desktop.
- In the dropdown list, find your account name and click to log in.
Performance and security settings
Modifying system preferences
- In the Apple menu, choose System Preferences.
- Configure processor performance and “sleep” functions:
- Click on Energy Saver.
- Slide the bar to “Never” for “Computer sleep”.
- Move the slider to your desired setting for “Display sleep”.
- Check ‘Wake for Ethernet network access’ and ‘Start up automatically after a power failure’.
- Return to the main System Preferences menu by clicking on Show All in the top menu bar.
- Configure printers
- Allow remote SSH access:
- Click on Sharing.
- Check the box next to Remote Login.
- Return again to the main System Preferences menu.
- Configure the firewall:
- Click on Security.
- Under the ‘General’ tab, check the box for ‘Require password after sleep or screen saver begins’, ‘Disable automatic login’, and ‘Use secure virtual memory’.
- Under the ‘Firewall’ tab, select ‘Set access for specific services and applications.’ The programs displayed in the list should reflect the choices made in the Sharing system preference (i.e., remote login (SSH) and possibly Apple Remote Desktop)
- Return once again to the main System Preferences menu.
Modifying /etc/profile
- The file
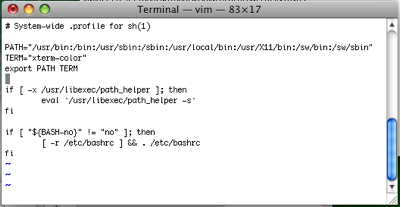
/etc/profileis a configuration file that the computer reads at start up. In this file, you can specify environment variables that will be applied system-wide to all users. The changes made here include thePATHandTERMvariables. ThePATHenvironment variable tells your computer where to look for command files (executables). Those included in this file are the default directories where commands are typically found.TERMis the environment variable that tells your computer what type of terminal you want.xterm-colorallows you to have terminals with colored directories. Specifying this variable here forces Terminal and X-terminal to have the same type. If the variable is left unspecified, Terminal is by defaultxterm-color, but X-terminal is justxterm. - Still in the terminal window, type the following command:
sudo vi /etc/profile Password: (enter your password) - Modify the file to look similar to the one shown below. To insert text using the vi editor, type the letter
i. This will switch vi into insert mode and the wordinsertshould appear at the bottom of the terminal window. You can type normally in insert mode. The added lines include two environment variables that are read by the computer at start-up. - When the file is updated, you want to apply it to the current terminal session:
source /etc/profile
MacOSX_setup_etc_profile.png
Configuring the tcp wrapper
- The tcp wrapper is a security feature that allows you to specify exactly who can have access to your computer via SSH. Once configured, it will block all incoming IP addresses except for the ones you specify.
- Once again using your favorite editor, create a new file called
/etc/hosts.allow. Remember that this file is in the root account, so you will need the sudo command to gain access. (For example, typesudo vi /etc/hosts.allow) - In the blank file, copy and paste the following lines:
ALL : .dept.univ.edu : allow ALL : .msi.umn.edu : allow ALL : .dept2.univ.edu : allow ALL : your.home.ip.address : allow ALL : ALL : deny - This file works in the following manner. The
ALLrefers to the services that you are granting access to. With a Linux machine, you could be even more specific and replaceALLwithSSHD. This would only allow SSH access from the machines with the designated IP addresses (or host names associated with each IP address). On the Mac, the SSH program was not compiled with the same tcp configuration, and usingSSHDin place ofALLdoes not have the desired effect. However, remember that when you turned on your firewall, you blocked every service but SSH, so on the Mac, usingALLis effectively the same as usingSSHD. The next part of the line is either a computer’s hostname or the computer’s IP address, or part of an IP address. After the hostname comes the allow/deny statement that tells the computer whether to allow access or deny it. Allowed IP addresses under this configuration are, in order of checking, addresses coming from the chemistry department at the University of Minnesota, or those coming from a Minnesota Supercomputing Institute supercomputer (.msi.umn.edu), or those from the chemical engineering and materials science department, or your home IP address. Anything that fails to match one of those specifications is denied access.
Enabling X11 forwarding by SSH
- This behavior is default on most linux boxes and will be required for remote logins. Setting this forwarding feature allows anyone with an account on your machine to use the X11 programs when they connect remotely.
- Open the file /etc/sshd_config:
sudo vi /etc/sshd_config Password: (enter your password) - Once the file opens, type
/X11so vi will search and find the line:X11Forwarding noWith the cursor on that line, type
ito move into insert mode, and comment out the line#X11Forwarding noor modify it to allow X11 forwarding:
X11Forwarding yes
Comments